A chemical wash is one of those services where most homeowners pay the bill without really understanding what they paid for. The technician arrives, disappears behind the indoor unit for 30 minutes, and leaves after a quick demonstration that cold air is blowing again. Was that thorough? Rushed? Worth the money? Impossible to judge without knowing the procedure.
This article opens the hood on a proper chemical wash at CoolX Aircon. Step by step, minute by minute, we walk through exactly what a trained technician does, why each stage matters, and what visual signs tell you whether the work was done properly. Armed with this, you can verify the quality of any chemical wash you pay for going forward.
How to Prepare Before the Technician Arrives
A chemical wash requires minimal effort from you, but a few small preparations make the visit smoother:
- Clear the workspace below and around the indoor unit. Move soft furnishings, electronics, and stored items out of the splash zone. Technicians lay down drop cloths, but empty space speeds everything up.
- Switch the unit off 10 minutes before the appointment. This lets the evaporator coil warm to room temperature, which helps the alkaline cleaner penetrate grime more effectively.
- Write down any specific complaints: weak cooling, strange smells, water drip, noises, anything unusual. Handing this list to the technician focuses their attention on the right problems.
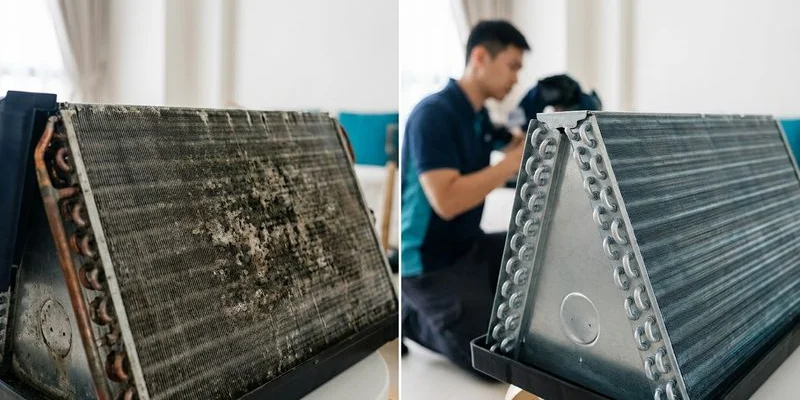
Step 1: Baseline Inspection (5 minutes)
The technician opens the front cover, inspects the filters, and shines a torch into the blower housing to gauge the condition of the fan and coils. They also briefly run the unit to establish a baseline cooling performance and airflow reading.
This baseline is important. Without it, there is no before-and-after comparison to confirm the wash actually improved anything. A thorough technician will note the inlet-outlet temperature gap (Delta T) at this stage.
Dark stains on the blower wheel point to mould colonies. Oil streaks around the copper flare joints indicate a possible refrigerant leak, which the technician should flag separately because no amount of cleaning will fix low gas pressure.
Step 2: Workspace Protection (5 minutes)
This stage is invisible to the homeowner but critical. Proper protection is the difference between a clean wash and water damage to your wall, floor, or electronics.
What happens:
- Heavy plastic sheeting goes on the floor directly below the unit
- A polyurethane “chemical bib” is strapped around the fancoil to funnel all runoff into a collection bucket
- The printed circuit board and any wiring are wrapped or disconnected to keep liquid away
- The front panel and filters are removed and set aside for separate scrubbing
If a technician skips the chemical bib and simply sprays with a catch bucket on the floor, dirty water will almost certainly end up on your wall or skirting. This is the single easiest way to spot a cowboy job.
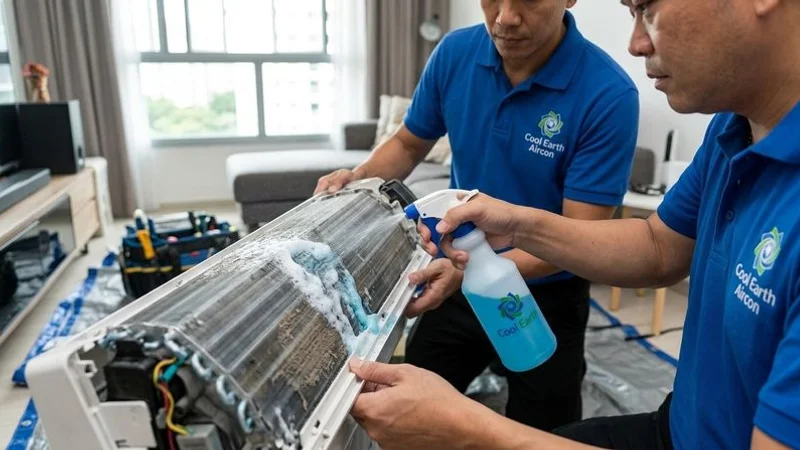
Step 3: Chemical Application to the Evaporator Coils (10 to 15 minutes)
This is the stage that actually does the cleaning work. A professional alkaline coil cleaner is applied to the exposed evaporator fins via pressurised pump sprayer. The chemical is specifically formulated to dissolve biological grime and grease without corroding aluminium, provided dwell time is managed properly.
The cleaner is allowed to sit for 10 to 15 minutes so it can penetrate the biofilm. During this wait, you will usually see the foam change colour from white to a dark brown or grey as it reacts with embedded dirt.
While the chemical is working, the technician takes the removed filters and front panel to a washbasin and scrubs them separately with the same alkaline solution before rinsing. This parallel workflow is how thorough technicians use the dwell time productively.
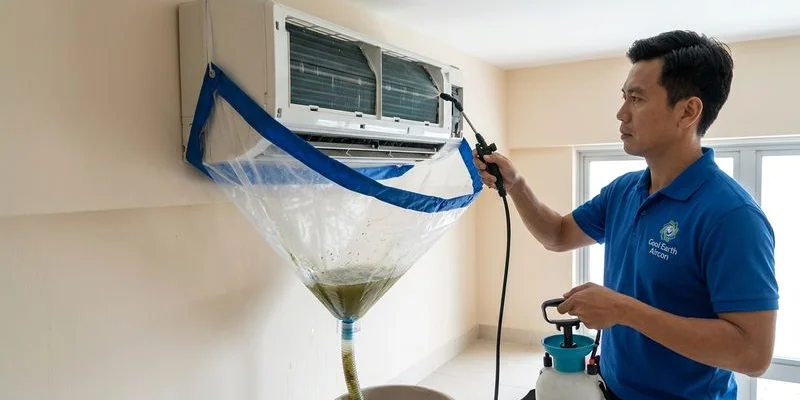
Step 4: Coil Rinse (5 to 10 minutes)
Once the dwell time is up, the coils are rinsed with a hand-pumped pressure sprayer at around 40 to 60 PSI. This is high enough to flush loosened grime out of the fins but low enough to avoid bending the delicate aluminium.
The dirty water flows down through the chemical bib and into the collection bucket. Most homeowners are shocked the first time they see this bucket. Units that looked “clean” from the outside routinely produce thick black runoff full of oxidised dust, biofilm, and bacterial residue.
The technician continues rinsing until the water runs clear. If the first chemical application was not enough to dislodge everything, a second pass with fresh cleaner may be necessary.
Step 5: Blower Wheel Treatment (10 minutes)
The cylindrical blower wheel is often the dirtiest component in the system. Its tightly spaced fins trap wet dust, cooking grease (especially in flats near an open kitchen), and biological grime.
During an in-place chemical wash, the technician sprays the alkaline cleaner directly into the wheel and rotates it by hand to coat every fin. A follow-up high-pressure rinse blasts away the loosened material. This process gets most of the build-up but cannot reach the very back of the fins, which is why chronically neglected systems eventually need a full chemical overhaul where the wheel is physically detached for soaking.
Our guide on chemical wash versus chemical overhaul covers when to escalate.
Step 6: Drain Pan and Condensate Line (5 minutes)
The drain pan sits under the coils and constantly holds a shallow film of water. Algae and bacteria colonise this environment quickly, and the resulting sludge is the number one cause of overflowing aircon leaks in Singapore homes.
The technician wipes down the pan with an antibacterial solution, then flushes the condensate drain line with fresh cleaner. A wet vacuum or hand pump at the outdoor end creates positive pressure that forces out any remaining jelly-like blockages. This is the step that prevents water damage for the next several months, and it is shockingly often skipped by budget contractors in a hurry.
Step 7: Reassembly and Verification (10 minutes)
With every internal component cleaned, the technician reverses the teardown. The chemical bib comes off, the filters and front panel are reinstalled, and the electrical protections are removed.
Then the unit is powered on for a verification run lasting at least five minutes. During this check, a thorough technician confirms:
- Airflow volume at the outlet louvres is noticeably stronger than the baseline
- Delta T between inlet and outlet registers 8 to 12°C of drop
- Water flows freely through the drain line with no pooling in the pan
- No unusual grinding or rattling from the blower motor
- The musty smell from the pre-wash baseline has gone
If any of these fail the check, the technician addresses the issue before packing up.
How Long Does the Full Service Take?
A complete chemical wash on a single wall-mounted unit takes 30 to 45 minutes when done properly. For a standard three-unit HDB System 3, budget 90 minutes to 2 hours including setup and final verification.
Anyone who claims to do a “full chemical wash” in under 20 minutes per unit is almost certainly skipping stages. Possibilities include no chemical bib, no coil dwell time, no drain line flushing, no blower wheel treatment, or no verification step. All of these shortcuts cost you money because the underlying grime stays put.
2026 Pricing in the Singapore Market
| Service | Typical Price (Per Unit) | Best For |
|---|---|---|
| Standard Chemical Wash (wall-mounted) | S$80 to S$130 | Routine annual deep clean |
| Chemical Wash (ceiling cassette) | S$120 to S$160 | Offices, shophouses, large rooms |
| Full Chemical Overhaul | S$150 to S$280 | Severely neglected units |
Multi-unit packages typically reduce the per-unit rate by 10 to 20 percent, making a full System 3 clean-up significantly cheaper than booking units individually.
How to Verify the Wash Was Done Properly
You do not need to hover over the technician, but a few minutes of attention at key moments tells you everything:
- Before spraying starts: is the chemical bib installed and the PCB protected?
- During rinsing: is the runoff visibly dirty, and does it eventually run clear?
- After reassembly: does the technician run a verification cycle and demonstrate the Delta T?
- Duration: did the full procedure take at least 25 to 30 minutes per unit?
A legitimate chemical wash satisfies all four checks. A rushed or skipped procedure fails at least two.
Why This Matters
A proper annual chemical wash does several things at once: it restores cooling efficiency (often a 20 percent improvement for neglected systems), eliminates the musty smell that indicates mould colonies, prevents the slow drip of indoor air pollution into your home, and typically pays itself back within three to four months of restored efficiency on your electricity bill.
Cheap chemical washes are worse than no wash at all, because they give you the false confidence that your system is clean while leaving most of the grime in place.
If you would like a professional, fully documented chemical wash with a 90-day workmanship warranty, contact our CoolX Aircon team for a booking. Our full chemical wash service is priced transparently so there are no surprises.

About the Author
Kok Wai Keong
Founder & Principal Technician
Mr. Kok founded CoolX Aircon Servicing in 2016 after 15 years handling commercial and industrial cooling systems. He leads a team committed to eco-friendly maintenance and transparent pricing.